Update 08/27/2013:
After trying to get the blog summary configuration in place in SharePoint and doing some feature discovery; I’ve decided to move on over to WordPress. WordPress seems more in line with Blogging; this first go around on SharePoint 2013 on the public side was disappointing. The internal site I still love with the rich feature set and sub-site spawning I could really see using it as a consultant to track documentation, deliverables and everything under the sun.

I’m a Database Administrator and Microsoft Business Intelligence practitioner by trade and with Power BI coming out; my money is on the cloud and the Office 365 suite. So to start off I thought I’d guide you through my experience setting this site up.
Get setup with an Office 365 Trial; including a public website
The first thing to do is to sign up for a trial enterprise account (Office 365 Trial). Click the “Trial Button”
You’ll be presented with a screen like this:

Fill out the necessary information and click the “Create Account” button at the bottom of the screen. Fill in your emergency contact information; this email address and mobile number will be contacted in the event that you forget your password as administrator of the site.

I recommend clicking on the “Sites” tab found in the upper right hand portion of the screen. It takes a minute to create a new account for a user.

While your sites are being provisioned; head on over the Admin “Office 365” tab. This is your main administrator dashboard and we will dive into it later on in this posting. The Administrator dashboard is where you get all notifications for outages of any kind, create new users, and buy new licenses, the works. At this point you should, if provisioning is done, you have a public website up and running. If you go back to “Sites” you should now see a screen like this:

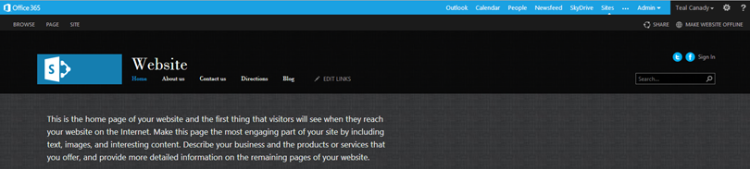
Click on “Public Site” and you should be brought to your new public site which will look something like this. The initial state will be Offline; so you should click on the “Make Website Online” in the upper right hand corner to bring the site to the masses.
The little gear in the upper right hand corner is your friend as is the site and page buttons on the upper left. In the Site section you can change the look and feel of your site.

This is really intuitive and I leave it up to you to poke around with the logo; the look and feel and creating links to other websites. The somewhat non-intuitive portion of this comes if you want to change the first the screen people see, the welcome screen. Head on over to the gear and click on “Site Settings”. Then click on “Welcome Page” (it’s the fourth link down under “Look And Feel”).

That should bring you over here to the site welcome page; where you’ll click browse.
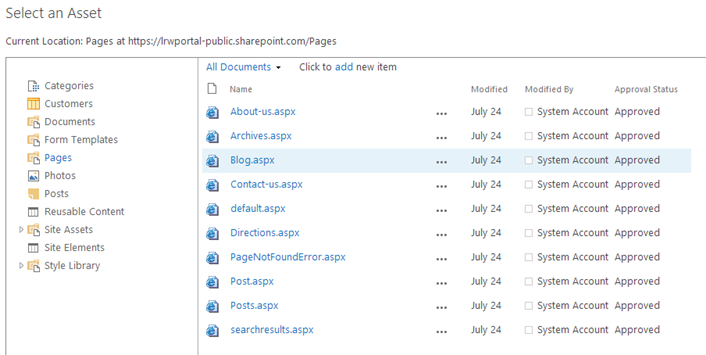
Click on the asset clearly marked blog to make it your welcome page, click insert. Now if you pull out the URL (https://YourSite-public.sharepoint.com) and put it in another window your blog will be the first thing to pop up.
Associate your new Office 365 with a domain
Ok so you have a public site with a web site a blog; but the URL kinda sucks. It works; but you probably want to go on out to a provider and buy a nice URL that your family will like; or hate that’s up to you. So after you do that; we move on to changing some configurations for your new domain…
You’ll need to go back to the “Admin” button in the upper right hand corner; then click on “Office 365”. Click on the “Domains” link

Which brings you here:
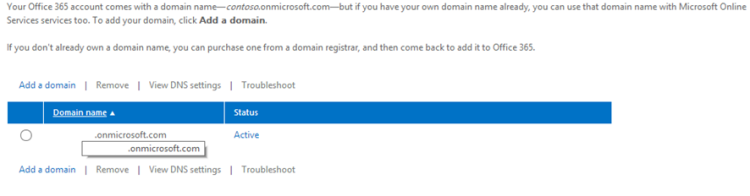
Click on add a domain; this brings up a wizard explaining how to add the domain information for various providers. The wizard will guide you through adding a domain to your site and provider. I’m not going to guide you through this one because it’s different for every provider but the guide I went through was easy to follow; it required an hour or so to propagate from my provider to the site. Once ownership is confirmed and the site is properly routing via the interwebs there is still a little left to do.
Go back to the admin button in the upper right hand corner; then click “SharePoint”. Which will bring you to the screen below:

Click the check box next to website and then click “Website Domains”

Associate your new domain to the site by selecting it in the “New URL” drop down and you should be all set.
Use your new Domain with an email address and login for Office 365
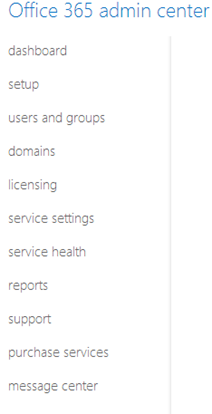
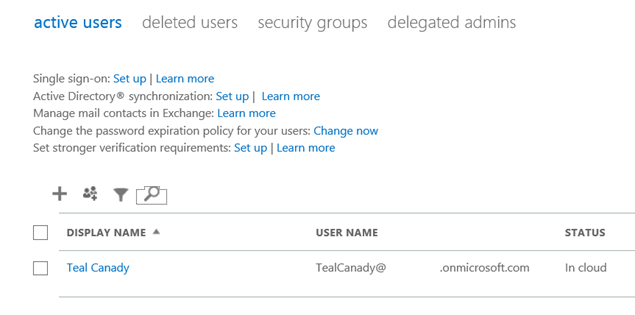
There are still some other optional configurations available to you; like setting up your email address to go with your domain and your login. Head back on over to the Admin Center for Office 365 and select “Users and Groups”
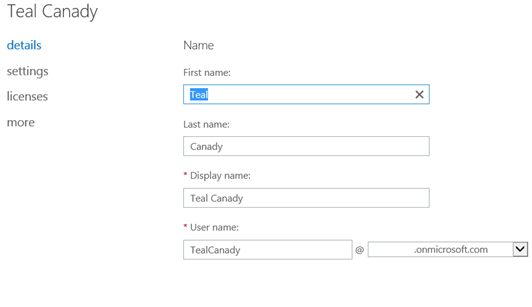
Select Your Account:
Click on Details and there is a drop down next to your username; change that to your new domain and you can now login to your SkyDrive, Outlook and Office 365 with just your domain (no more youdomain.onmicrosoft.com just yourdomain.com)
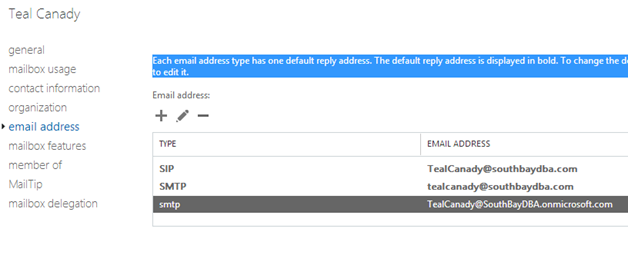
For your email address you’ll need to select “More” and then “Edit Exchange Properties”

Once in exchange you need to click “Email Address” for your user and then select the + sign to add an email address. Also I would recommend clicking the checkbox for “Make this the reply address”.
Caveat(s) and Conclusions
It is fairly straight forward to set all of this up; but some words of warning on a couple of steps.
After I changed my email address / user account to reflect my domain; if I click through the Sites->”Public Site” it no longer comes up with “Administrator Mode” for the public site. To get around this bug I went to my site settings tab in the team site; copied the URL and replaced it with my new domain. This redirected me properly to the site settings. For me it was: http://www.southbaydba.com/_layouts/15/start.aspx#/_layouts/15/settings.aspx?Source=https%3A%2F%2Fsouthbaydba%2Esharepoint%2Ecom%2FSitePages%2FHome%2Easpx
I tried not using the welcome page wizard to adjust the home page to blog; instead I changed the names of the files for blog and home (default.aspx to purpose.aspx and blog.aspx to default.aspx) this resulted in about 12 hours of time where the links in my site were having issues and in general chaos erupted. Behind the scenes there are indexing operations being performed by SharePoint; so I had to wait for these to catch up to my changes and eventually everything worked out. I would say; just use the wizard.
I’m still unable to publish draft copies of a Blog using word 2013; it’s weird. If I get it resolved I’ll update this post.
Depending on your needs you can use the $5, $8, $12.50, $15 or $20 dollar a month version of Office 365 (You can check out the comparison here; Office 365 Licensing. I used the enterprise trial version for this because I really wanted the Business Intelligence functionality for testing and demonstration purposes. I still have some unanswered questions I will explore and hopefully make another post about; some of which are:
What do I need to connect to my local data store through Business Connectivity services (BCS)?
How easy is it to add another html page that I create to an existing public site?
Customization; how difficult is it to alter the existing templates for a more personal feel?
I’ll leave all these for a future post; I really am looking forward to digging into power query next!
